Welcome to the AEDCPR Online First Aid Certification course. In an emergency, seconds count. This class will prepare you for an emergency and give you the knowledge and confidence to help save a life. Learn to recognize when an emergency exists and what to do in such situations. You will learn how to help when medical assistance is needed, when to activate EMS, and what to do until they arrive.
We offer two types of First Aid certifications—our Basic First Aid certification class covers emergency situations for adults, children, and infants. Our CPR/AED/First Aid certification includes everything from the First Aid class and our Healthcare Provider BLS Course.
This class covers everything in the Basic First Aid Course. It also covers the First Aid portion of the CPR/AED/First Aid Course. For the complete course, please visit our CPR/AED/First Aid Course page.
Included in This Course:
First Aid Basics
Basic first aid concepts
Responsibilities of first responders
Scene safety
Universal precautions
EMS and 911 systems
Medical Emergencies
Respiratory
Choking
Asthma
Allergies
Epi-pen
Heart attacks
Diabetes
Fainting
Injury Emergencies
External bleeding
Internal bleeding
Wounds
Head, neck, and spinal trauma
Burns
Electrical injuries
Environmental Emergencies
Animal bites
Insect stings
Snake bites
Heat emergencies
Cold emergencies
Frostbite
Poisoning
First Aid Certification Test
After completing the class material, there is a test. It is the same exact test we give in our classroom-based courses. It is a multiple-choice test that contains 25 questions. We strongly advise you to complete all the course material before taking the test. However, you can skip ahead if you like. There is no time limit on the test. We save test answers for 30 days. So you can leave the test to review the class material. When you return to the First Aid test, you can continue from where you left off or start over. You can re-take the test as many times as you like.
Some jobs may require you to perform first aid while you are working. For example, law enforcement officers, firefighters, lifeguards, flight attendants, and others all have a duty to perform first aid should the need arise while on duty. If they are off duty, they may choose whether or not to provide first aid.
Your Role in the EMS System
Your role as a First-Aid Responder is to:
Recognize when an emergency exists.
Make sure that the scene is safe.
Call 9-1-1
Provide care until someone with more advanced emergency training arrives.
When you call 9-1-1, you activate the network of emergency medical services (EMS)
Asking to Give First Aid
When you come upon an ill or injured person who is responsive, introduce yourself as a first-aid provider and ask whether you may help before touching them. Everyone has the right to refuse first aid.
Ask if you can help:
If they agree, provide first aid.
If they refuse, call 9-1-1 and stay with them until help arrives.
If they are confused or cannot answer, assume they want help and provide first aid.
In Every Emergency, Follow These Steps:
Assess the scene
Phone for help
Take universal precautions
Find the problem
Protect the person’s privacy
Assess The Scene | Call 911
Scene Assessment
It is essential to ensure the scene is safe and that there is no danger threatening you or the person you are trying to help. Even after you begin providing first aid, you must remain aware of your surroundings and alert to anything on the scene that might change and put you in danger.
While Assessing the Scene, Ask Yourself These Questions:
Is there any danger to me or the person I am trying to help?
You should only move an injured person if they are in danger or if you need to do so to provide first aid or CPR safely.
Are there others around to help?
If there are, you can have someone else call 9-1-1 if necessary. If not, you will have to do it yourself.
Who is ill or injured?
Can you tell how many people are hurt, and what happened?
Where are you?
You'll need to tell the 9-1-1 dispatcher how to reach your location. If there are any bystanders nearby who can help, send one of them to meet the emergency responders and guide them to the scene.
Triage | Determine Type and Severity of the Problem
Before providing first aid, you need to assess the ill or injured person to determine the problem.
Check whether they are responsive. Tap and shout, "Are you okay?" If they are unresponsive, check to see if they are breathing.
If they are breathing and don't need immediate first aid, check for any obvious signs of injury, such as bleeding, burns, broken bones, or bite marks.
Look for any medical information jewelry to see if they have any serious medical conditions.
Then Follow These Steps to Find the Problem.
Make sure the scene is safe.
Check whether the person responds. Approach them, tap on them, and shout, "Are you okay?"
If the Victim is Responsive
Ask them what the problem is.
If they only move and moan, but can't form coherent words, shout for help. Call 9-1-1 or send someone else to do it, and get the first-aid kit or an AED.
Look for the obvious signs of injury.
Look for medical information jewelry to find out if they have any serious conditions.
If the Victim is Unresponsive
Shout for help and phone 9-1-1
If someone else is available, have them call for help and get the first aid kit and AED.
If you're alone but have a cell phone, call 9-1-1 and put it on speaker so that you can listen to the dispatcher's instructions while you provide care. You will have to get the first-aid kit and the AED yourself.
Check for breathing
If they are breathing normally, stay with them until help arrives. Check for injuries and medical information, such as a bracelet on a pendant.
If they aren't breathing normally or are only gasping for air, begin CPR and use an AED.
Let advanced help take over when it arrives.
Using Caution When Moving an Ill or Injured Person
In most cases, you should not move someone when giving first aid, which is especially important if you think they may have a pelvic or spinal injury.
Only move the victim when:
If the area is unsafe, you should move them to a safer place before giving aid.
If the person is unresponsive and breathing normally, you may roll them onto their side. By doing so, you may keep their airway open in case they vomit.
If possible, grab them by the clothes as you move them to safety.
Medical Emergencies
Asthma
Asthma is a disease of the air passages. A person having an asthma attack will have trouble breathing.
Signs of breathing problems due to asthma
Breathing very fast or very slow.
Having trouble with each breath.
Noisy breathing- you hear a loud or whistling sound as air enters or leaves the person's lungs.
Difficulty speaking. Only being able to make sounds or being unable to speak more than a few words at a time between breaths, even though the person is trying to say more.
When someone has a breathing condition such as asthma, they often know about it and carry an inhaler, which can help them breathe more easily within a few minutes of using it. Sometimes a person can have such a hard time breathing that they may need help using their inhaler. For this reason, it is essential to be ready to assemble the inhaler and help them use it.
How to assist someone having an asthma attack
Make sure the scene is safe.
Ask the person if they need help. If they do need help, ask them if they have medicine.
If they do have medicine, get it for them. Then, you can assemble their inhaler and help them use it.
Call 9-1-1 or activate EMS if:
The person does not have medicine
Their breathing does not improve after using the medicine
Their breathing gets worse
They have trouble speaking
They become unresponsive
Stay with the victim until someone with more advanced training arrives and takes over.
Assembling and using an inhaler
Most inhalers are pre-assembled. Inhalers are composed of two main parts: the canister that contains the medicine and the mouthpiece. Sometimes a spacer can be attached to make it easier to inhale the medicine.
Follow these steps to assemble a typical inhaler:
Shake the medicine canister first
Put the medicine canister into the mouthpiece
Remove the cap from the mouthpiece
Attach the spacer if there is one available, and if you know how
Fainting
Fainting is a brief period, usually less than a minute, when a person becomes unresponsive, then seems fine. Feelings of dizziness or light-headedness often precede fainting. Fainting may occur when someone:
Stands without moving for a long time, especially in hot environments
Has certain heart conditions
Suddenly stands after squatting or bending over
Receives bad or shocking news
If someone is dizzy and you suspect they may faint, help them lie flat on the ground. Call 9-1-1 if the person does not improve or becomes unresponsive.
If someone faints and becomes responsive
Ask the person to lie flat on the floor until they feel normal and can sit up.
If the victim fell, check for any injuries sustained.
If someone faints and is unresponsive
Call 9-1-1 or activate EMS
Begin CPR if necessary
Hypoglycemia and Hyperglycemia
Diabetes is an endocrine disorder that affects blood sugar levels. Excessively high blood sugar (hyperglycemia) or excessively low blood sugar (hypoglycemia) can cause problems. Some people with diabetes take medications like insulin to keep their blood sugar in a normal range.
Low blood sugar can occur if a person with diabetes does not eat, vomits, engages in too much physical activity for the amount of food they've eaten, or if they have used too much insulin.
Signs of low blood sugar in diabetics:
Irritable mood
Confusion
Hunger or thirst
Feeling of weakness
Drowsiness
Sweating
Seizures (In more extreme cases)
If the person can sit up and swallow
Ask them to eat or drink something containing sugar to raise their blood glucose levels quickly. Examples include glucose tablets, fruit juice, fruit leather, soft chew candy, or whole milk..
If the person can NOT sit up or swallow, do not force them. Instead:
Have them sit or lie down quietly. If they do not improve within 15 minutes, call 9-1-1, or have someone else call.
Severe Allergic Reactions
Many people have allergies, but a severe allergic reaction can become a life-threatening medical emergency. Some allergens that can cause a severe reaction include:
Eggs
Peanuts
Insect bites or stings
Some medications
Chocolate
Allergic reactions vary, from mild to severe. MILD allergic reactions can have, but are not limited to, the following signs:
Itchy skin
Raised, red rash on the skin (Hives)
Stuffy nose, sneezing, and itching, especially around the eyes
In some cases, seemingly mild allergic reactions can become severe within a few minutes. SEVERE allergic reactions can have some of the following signs: Sometimes, the damaged heart muscle may trigger an abnormal heart rhythm, leading to sudden cardiac arrest.
Trouble Breathing
Swelling of the face or tongue
Signs of shock
Epinephrine Pens for Severe Allergic Reactions
Epinephrine is a drug used to treat severe allergic reactions. It is available by prescription as an injectable pen, commonly known as an EpiPen. People who have known severe allergic reactions are encouraged to carry epinephrine pens at all times.
There are two different types of epinephrine pens: electronic and spring-activated. They are different for children and adults. It is important to be sure they use the correct prescribed device.
If a person has an epinephrine pen, they will most likely know when and how to use it. Trained individuals licensed by their state or employer can administer the injection. Administer the epinephrine injection at the side of the thigh, about halfway between the hip and the knee.
Epinephrine Pens are medical waste; dispose of them in an approved sharps container.
Strokes
A stroke is a medical emergency that occurs when blood stops flowing to part of the brain. It can happen when a blood vessel in the brain becomes blocked or begins to leak.
It is essential to recognize the signs of a stroke and provide immediate medical treatment. Treatment provided in the first hours after a stroke occurs can help to minimize damage and aid in recovery.
Warning Signs of a Stroke:
You can use the FAST method to remember the warning signs of a stroke. FAST stands for Face, Arms, Speech, and Time.
Face Drooping: Does one side of the face droop or feel numb?
Arm weakness: Is one arm numb or weak?
Speech difficulty: Is the person having trouble speaking or slurring words?
Time to call 9-1-1: If someone shows any of these symptoms, you should call 9-1-1 immediately!
Helping a Stroke Victim
If you think someone is having a stroke, follow these steps:
Activate EMS: Call, or have someone else call 9-1-1
Get a first aid kit and an AED.
Note the time when the stroke signs first appeared.
Remain with the stroke victim until someone with more advanced training arrives and can take over.
If the person becomes unresponsive or stops breathing normally, or is only able to gasp, give CPR.
Seizures
A Seizure is abnormal electrical activity in the brain. Most seizures stop after a few minutes and are due to a medical condition called epilepsy. Seizures can also occur as a result of other conditions, such as low blood sugar, heat-related injury, head injury, poisoning, or sudden cardiac arrest.
Signs of a Seizure:
Loss of muscle control
Jerky movement of the arms, legs, and other parts of the body
Stiffening of the body
Eyes rolled back
Confusion
Loss of bladder or bowel control
Falling to the ground
However, there are less common signs. Sometimes, a person having a seizure may become unresponsive and have a glassy-eyed stare.
During a seizure, the person may bite their tongue or the inside of their cheek. You can give first aid for that injury after the seizure has stopped. After it stops, it is not uncommon for the person to be confused, slow to respond, or even fall asleep.
The most crucial step to take when helping someone who is having a seizure is to protect them from injury.
Use the following steps to help prevent injury to a person who is having a seizure.
Move furniture or other objects safely out of the way.
Place a small pad, pillow, or towel under the person's head.
Call 9-1-1 or activate EMS.
Get a First Aid kit.
Use the following steps to help someone who has just had a seizure:
Check to see if the person is breathing and is responsive.
Stay with them until someone with more advanced training can arrive and take over.
If they are having trouble breathing because of vomit or fluids in their mouth, roll the person onto their side.
If they are not breathing normally or are unresponsive, give CPR.
Provide First Aid for injuries caused by the seizure.
Traumatic Injuries
This section of the course covers the most common types of injuries you’re likely to encounter. They include:
External bleeding
Wounds
Internal bleeding
Head, neck, and spinal injuries
Broken bones and sprains
Burns and electrical injuries
In some cases, these injuries may not seem urgent, but it’s important to remember that they can become serious if they’re left untreated.
External Bleeding
Bleeding can be internal or external. If left uncontrolled, it can be a serious threat to a person’s life. It’s important to know what you’re looking at when helping someone who is bleeding.
Minor Bleeding is usually the result of small scrapes and cuts. In most cases, you can stop the bleeding by applying pressure. Be sure to stay calm. A lot of the time, bleeding will look worse than it actually is.
Severe Bleeding occurs when a large blood vessel is torn or cut, resulting in rapid blood loss.
Dressing vs Bandaging
Many people confuse the terms' dressing' and 'bandage'. They are actually two different things.
A dressing is a material, such as a clean cloth or gauze, that is used directly on a wound to stop bleeding.
A bandage is a material used to protect or cover up an injured body part. It may also help pressure a wound.
You may use dressings and bandages together. A bandage can be placed over a gauze dressing to secure it to the wound.
When to phone 9-1-1 for bleeding
You should call, or ask someone to call 9-1-1 if:
The person is bleeding excessively
You cannot stop the bleeding
They show signs of shock
You suspect they may have a head, neck, or spinal injury
You aren’t sure what to do
Severe Bleeding
Pressure and Bandaging
Controlling bleeding by direct pressure and bandaging
Follow these steps to help someone who is bleeding:
Make sure the scene is safe.
Get the first aid kit, or have someone else get it if they are available
Put on personal protective equipment (PPE)
If they can, ask the injured person to apply pressure to the wound while you put on your PPE. Apply dressings from your first aid kit. Put pressure on the dressings over the bleeding area. Use the flat part of your fingers or the palm of your hand.
If the bleeding does not stop, add a second dressing and press harder. Do not remove a dressing once in place. You may cause the wound to bleed more. Instead, keep pressure on the wound until it stops.
Once the bleeding has stopped, or if you can’t keep pressure on the wound, firmly wrap a bandage over the dressings to hold them in place.
If the cut is minor, wash the area with soap and water before applying a dressing.
Tourniquets
When an arm or leg won’t stop bleeding, you can use a tourniquet. Make sure to call 9-1-1 and get an AED if possible; uncontrolled bleeding can lead to more complications.
Your first-aid kit should include a pre-made tourniquet. It should have two main components: a strap wrapped around the injured person’s arm or leg. The other is a straight, stick-like object called a windlass, which tightens the strap. If used correctly, a tourniquet should stem the flow of blood. It is also likely to cause pain as the bleeding stops..
Once the tourniquet is in place, note the time and leave it alone.
Applying a pre-made tourniquet
Follow these seven steps when using a pre-made tourniquet on an injured person.
1: Make sure the scene is safe
2: Call 9-1-1, get your first aid kit, and an AED if available.
3: Put on your PPE.
4: Place the tourniquet approximately 2 inches above the injury.
5: Tighten it until the bleeding stops.
6: Note what time you placed the tourniquet.
7: Once it is in place and the bleeding has stopped, leave it alone until someone with more advanced training arrives and takes over.
Making and applying a tourniquet
If you don’t have a pre-made tourniquet, you can make one. Follow steps 1-3 as normal.
1: Make sure the scene is safe
2: Call 9-1-1, get your first aid kit, and an AED if available.
3: Put on your PPE.
After doing all of this, it’s time to make the tourniquet.
4: Fold a cloth or bandage so that it’s long and at least 1 inch wide.
5: Wrap the bandage about 2 inches above the injury.
6: Tie the ends of the bandage to a stick-like item. It can be a small hand tool, a stick, or something similar. The stick will work as a windlass.
7: Turn it until the bleeding stops.
8: Secure the makeshift windlass so that the tourniquet stays tight.
9: Note what time you placed the tourniquet.
10: Leave it alone until someone with more advanced training arrives and takes over.
Severe Trauma
Penetrating and Puncturing Injuries
Penetrating and puncturing injuries require special care. When a sharp object, such as a knife or a nail, has penetrated the body or punctured the skin, you don’t treat it as if it’s a normal bleeding injury.
When trying to help someone with a penetrating or puncturing injury, you should take the precautions you normally would.
Make sure the scene is safe.
Call 9-1-1
Put on your PPE.
When providing aid, try to stop any visible bleeding.
If the object remains stuck inside their body, do NOT remove it. Leave that to a professional healthcare provider. Doing so may cause more bleeding and damage.
Amputation
Traumatic amputation is when any part of an arm or leg is cut or torn off. Certain body parts, such as toes and fingers, may be reattached in some cases. It is essential to know the steps you must take to stop bleeding and protect the amputated part.
Make sure that the scene is safe.
Call, or have someone else call 9-1-1.
Put on PPE
Try to stop the bleeding of the injured area with very firm pressure. Bleeding may take a long time to stop.
If you have found the amputated part:
Rinse it with clean water.
Cover it with a clean dressing.
Place it in a watertight plastic bag.
Place the plastic bag in another container with ice or water and ice.
Label the container with the person’s name and the current date/time.
Send the part to the hospital with the victim.
Important: The amputated body part should not come into direct contact with ice. Extreme cold can damage it.
Internal Bleeding
Internal bleeding, or bleeding inside the body, isn’t always obvious. You might be able to see a bruise under the skin, or you might not see any signs at all. You also won’t be able to determine just how much bleeding has occurred.
You should suspect internal bleeding if a person:
Has been injured in a car crash, hit by a car, or has fallen from a great height.
Has sustained an injury to the chest or abdomen, including bruises.
Has suffered a sports-related injury, such as being hit with a ball or colliding with another person.
Has abdominal pain or chest pain after an injury.
Is short of breath after an injury.
Is vomiting or coughing up blood after an injury.
Shows signs of shock, but not external bleeding.
Has a knife or gunshot wound.
If you suspect internal bleeding:
Make sure the scene is safe.
Call 9-1-1
Get the first-aid kit and AED.
Put on PPE.
Have the person lie down, and ask them to keep still.
Check for signs of shock.
Give CPR if you need to.
Shock
A person may go into shock when they lose a large amount of blood, have a heart attack, a severe infection, or an allergic reaction. It's essential to recognize the Signs of Shock.
Symptoms of Shock Include:
Feeling weak, dizzy, or faint
Feeling nauseated or thirsty
Pale or grayish skin
Skin that is clammy or cold to the touch
Being agitated, restless, or confused
Helping a Person in Shock
Make sure the scene is safe.
Call 9-1-1 and get the first aid kit and AED.
Help the person lie down on their back.
Cover them with a blanket to keep them warm.
Check to see if CPR is needed.
Head, Neck, and Spinal Injuries
If someone has sustained a head, neck, or spinal injury, be extremely careful when moving them, and only do so if necessary.
A Person is Likely to Have a Head, Neck, or Spinal Injury if They:
Have fallen from a height
Took a strong blow to the head
Were involved in a car crash
Were in a bicycle/motorcycle crash, especially if they weren’t wearing a helmet.
Signs and Symptoms of a Head Injury
The victim does not respond to you, or only moans instead of forming coherent words.
The victim acts confused or sleepy.
Vomiting
Demonstrates trouble seeing, walking, or moving any part of the body.
The victim has a seizure.
If someone has a head injury that causes them to lose consciousness, their symptoms get worse, or they show other causes for concern, make sure they are evaluated by a healthcare provider as soon as possible. You should call 9-1-1 immediately if they become unresponsive. These people should not operate heavy machinery, play sports, drive a car, or engage in any strenuous physical activity until their doctor tells them it’s okay.
Spinal & Cervical(Neck) Injuries
The most common causes of spinal injuries include falls, bicycle or motor vehicle accidents, sporting accidents, and acts of violence. You should suspect that a person has a spinal injury if they:
Feel tingling or are weak in the extremities.
Appear intoxicated
Are not fully alert
Have suffered other painful injuries, especially to the head or neck.
Have pain or tenderness in the neck or back.
Helping Someone With a Possible Head, Neck, or Spinal Injury
Call 9-1-1 and get the first aid kit and AED, or send someone else.
Make sure that the person remains as still as possible.
Do not twist or turn their head or neck unless it is necessary.
CAUTION: If you suspect a person has suffered a spinal injury, do not move them, twist or turn their head or neck. The only exceptions are if you need to:
Move them out of danger
Turn them to give CPR
Reposition them because they are vomiting, have fluids in the mouth, or are having trouble breathing.
Bone, Joint & Muscle Injuries
Broken Bones and Sprains
Bone, joint, and muscle injuries are common. Sometimes a broken bone can be hard to detect at a glance; often, an X-ray is needed.
When dealing with a possible broken bone or sprain, take the following steps:
Make sure that the scene is safe.
Get the first aid kit.
Put on your PPE.
If the person has any open wounds, cover them with a dressing.
Place a towel over the injured body part.
Place a bag of ice and water on top of the towel.
Keep it in place for up to 20 minutes,
You should call 9-1-1 if the person has a large open wound, if the injured body part is abnormally bent, or if you aren’t sure what else to do. If the person is still in pain, they should avoid using the injured part of the body until they have it examined by a healthcare provider.
Splinting
Use a splint to immobilize an injured body part. When a broken bone is bent or showing through the skin, you should not straighten it. If the injured area is bleeding, apply direct pressure and a dressing before applying the splint. Do not attempt to align bones or joints, as this could make things worse. If any broken bones are showing through the skin, cover them with a clean dressing and apply a splint as needed.
Applying a splint
Make sure the scene is safe.
Get the first aid kit.
Find an object you can use to prevent the injured arm or leg from moving.
You can make a splint from rolled-up magazines or towels, pieces of wood, or anything that prevents the body part from moving and from sustaining further injury.
The splint should be longer than the injured area.
The splint should support the joints above and below the injury.
Cover broken skin with a clean cloth.
Tie or tape the splint to the injured limb so that it is supporting the injured area.
Use tape, gauze, or cloth to secure it in place. It should be snug, but not too tight.
If the splint is rigid, try padding it with a soft material, such as clothing or a towel.
Keep the limb still.
Burn Injuries
Burn Classifications
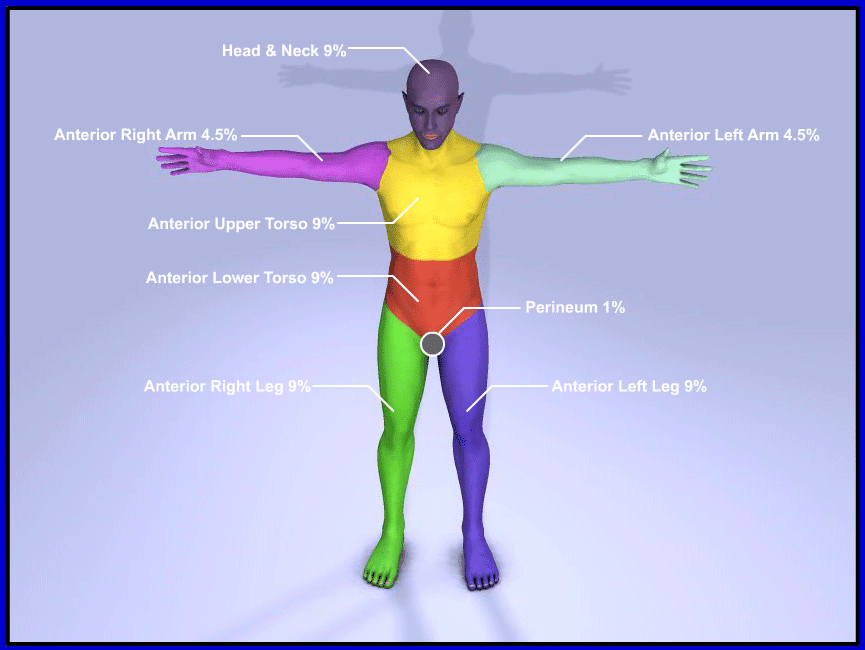
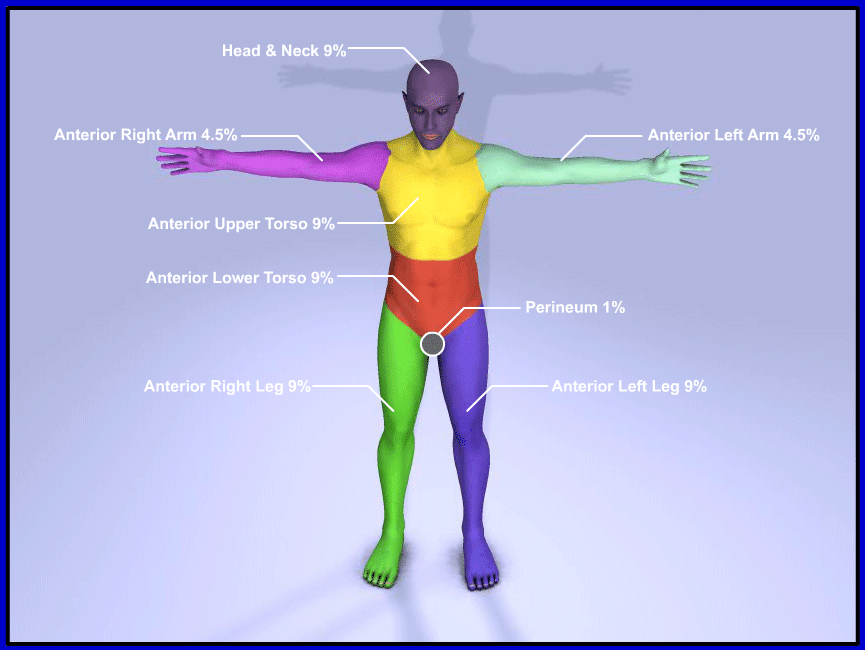
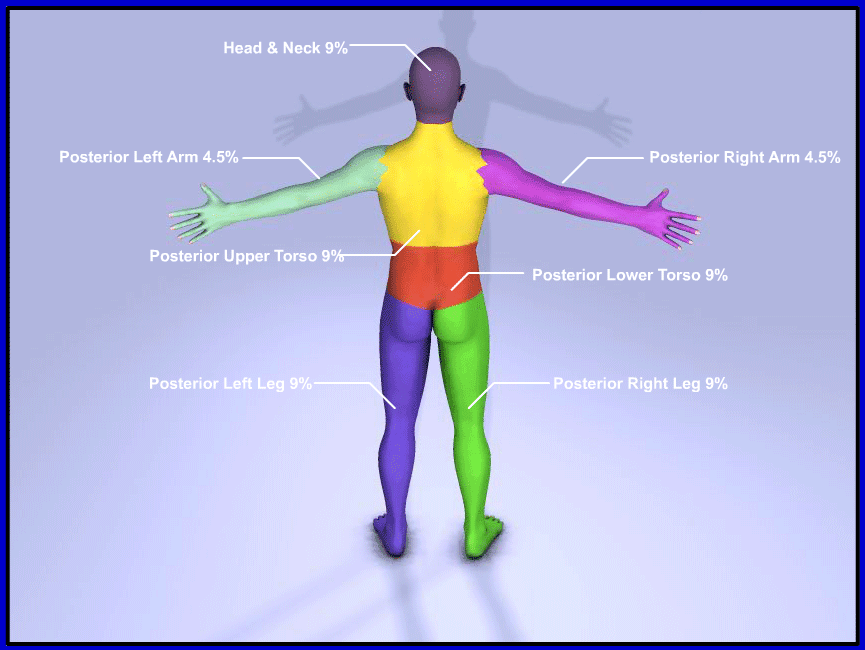
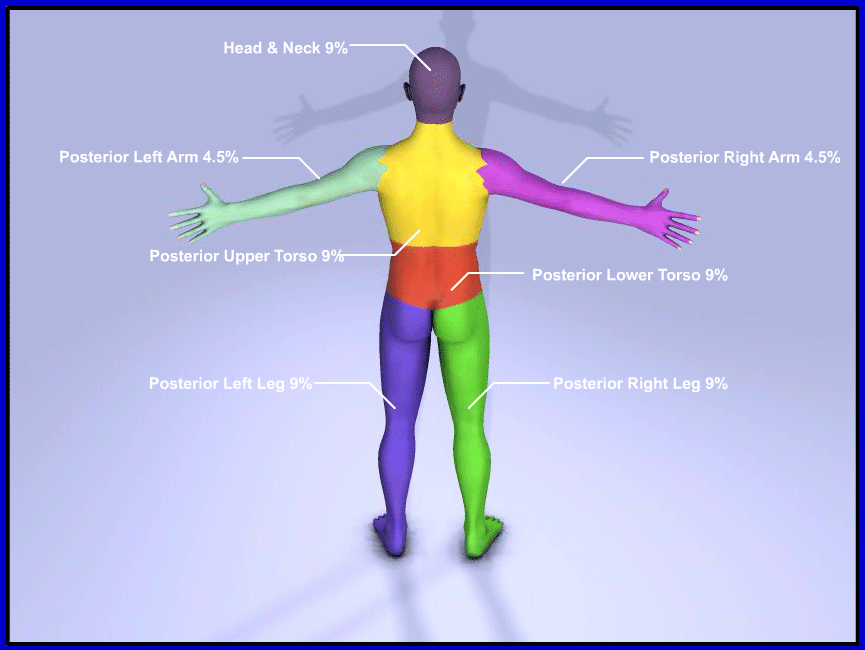
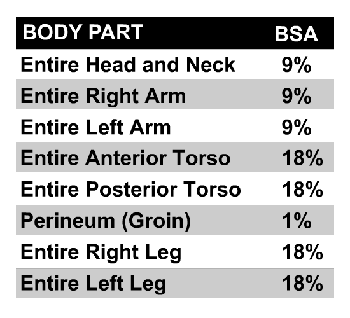
Burns are classified as 1st Degree (superficial), 2nd Degree (partial thickness), or 3rd Degree (full thickness) depending on the depth of the injury. You can quickly calculate the Total Body Surface Area using the "Rule of 9's".
1st Degree Burn
Epidermis
The skin will appear red, not blistered.
The area will be painful and tender.
2nd Degree Burn
Epidermis, Dermis
The skin will appear red or white with blisters.
The area will be severely painful.
3rd Degree Burn
Epidermis, Dermis, Subcutaneous Fat, Muscles
The skin will appear leathery and dark brown to black.
The inner area will not be painful, but the outer edges will be.
Heat, chemicals, or electricity can cause burns. Contact with hot surfaces, hot liquids, steam, or fire causes heat burns. When treating a burn, the only thing you should put on it is cold water and a clean dressing. Ice can actually damage the burned area and make things worse.
When treating a small burn:
Make sure the scene is safe.
Get the first aid kit.
Put on PPE.
Cool the burn area with cold water for at least 10 minutes.
Make sure the water isn’t ice cold.
If there is no cold water, use a cold compress (but not freezing).
Run cold water on the burn until it no longer hurts.
Cover the burn with a dry, clean nonstick dressing.
When treating a large burn
Make sure the scene is safe.
Call 9-1-1 if there is a fire, if the burn is very large, or if you don’t know what to do.
If the person or their clothing is on fire, put out the fire. Have them "Stop, Drop, and Roll". Then cover them with a wet blanket.
Remove the wet blanket once the fire goes out.
Remove clothing and jewelry that is not stuck to their skin.
Cool the burn area with cold water for at least 10 minutes.
Cover the burns with clean, dry, nonstick dressings.
Cover the person with a dry blanket.
Check for signs of shock.
If they have a large burn, they should see a healthcare provider as soon as possible to determine if any further treatment is necessary.
Rule of Nines
First Responders and Emergency Facilities use the Rule of 9's to determine the total BSA (Body Surface Area) affected by a burn. To estimate the body surface area of a burn, the Rule of 9's assigns BSA values to each major body part. The Rule of Nines allows first responders to quickly estimate the area of the body affected by the burn. For example, a burn covering half of the victim's right arm will have a BSA value of 4.5% (half the value of the entire arm). A burn covering the entire right arm and the entire front of the victim's torso will have a BSA value of 27%.
Bites and Stings
Human and Animal Bites
Animal bites that break the skin may bleed or become infected. However, bleeding and infection are not the only concerns. You should consider the risk of rabies from wild or domestic animals. Bites from wild animals such as raccoons, bats, and skunks cause most rabies cases. Domestic dogs can also carry rabies if bitten by another infected animal.
Bats pose a particular risk of rabies. Anyone who has had direct contact with a bat should contact a health care provider as soon as possible.
If a person has suffered a human or animal bite, take the following steps:
First, make sure the scene is safe for both you and the person bitten by the animal.
Wash the wound thoroughly with soap and water, especially after animal bites.
Apply a bag of ice and water wrapped in a towel to ease swelling and bruising.
If bruising or swelling does occur, place the bag of ice and water wrapped in a towel on the bite for up to 20 minutes.
Call a health care provider as soon as possible for any bites that have broken the skin.
Snakebites
You can sometimes identify snakes by their color or bite mark. Identifying the type of snake that caused a bite can be helpful, but if you are not sure, assume the snake was poisonous.
Symptoms of a poisonous snake bite include:
Pain in the bite area that gets worse over time
Swelling of the bite area
Vomiting, nausea, sweating, or weakness
Scene safety and snakebites:
While you ensure the scene is safe, be very cautious around any snakes. Go around the snake.
Do NOT try to handle the snake even if it has been killed or wounded. A snake can bite even if it is severely wounded and close to death.
Snakebite Treatment
If a snake has bitten someone, follow these steps:
Make sure the scene is safe for both you and the bite victim
Get a first aid kit.
Wear PPE.
Ask an adult to move others away from the area and have them call 9-1-1.
Ask the injured person to remain calm.
Have the injured person remain still. Ask them to avoid moving the affected part of the body.
Help the bite victim remove any tight clothing or jewelry.
Wash the area gently with soap and running water.
Keep the person calm and stay with them until someone with more advanced training arrives.
Marine Bites and Stings
Marine animals can also cause bites and stings. A bite or sting from a jellyfish, stingray, or stonefish can cause pain, redness, swelling, or bleeding. In some cases, they can even be fatal if the victim has an allergic reaction to the venom.
Helping a person with a marine bite or sting
Make sure the scene is safe for you and the person who was bitten or stung before giving first aid.
Get a first aid kit.
Wear PPE.
Have the injured person be quiet and still.
Wipe stingers or tentacles off with a towel or gloves.
If a jellyfish stung the victim, thoroughly rinse the injured area with vinegar for at least 30 seconds. If vinegar is unavailable, use a mixture of water and baking soda.
Soak or rinse the stung area with hot water. You may also have the injured person shower in water as hot as they can stand for 20 minutes.
See a healthcare provider for any bites or stings that break the skin.
Bee, Insect, and Spider Bites and Stings
In most cases, bug bites and stings will only cause minor itching, swelling, or pain at the site. Some bites and stings can be serious or fatal if the person who was bitten or stung has a severe allergic reaction or the insect injected poison (venom).
Helping a person who has been bitten or stung:
Make sure the scene is safe for you and the victim before giving treatment.
Get a first aid kit.
Wear PPE
If the person was stung by a bee and the stinger is still in the person’s skin, remove it. Gently scrape off the stinger and venom sac with something hard and dull, like a credit card. Avoid using items that will squeeze the stinger or venom sac.
Wash the bitten or stung area under running water with soap.
Apply a bag of ice and water wrapped in a towel to the affected area for up to 20 minutes.
Watch for signs of a severe allergic reaction for at least 30 minutes. If the person is known to be allergic and has an epinephrine pen, you should make sure they are prepared to use it.
Although many insects have stingers, bees are the only animals that leave their stinger behind at the site of the sting. If you or someone else is stung by a bee, look for and remove the stinger.
Poisonous Spiders and Scorpions
Non-poisonous insect bites usually only cause minor signs of itching and redness at the bite area. Poisonous bites or stings from spiders or scorpions can cause much more serious symptoms.
Signs of poisonous spider bites and scorpion stings include:
Severe pain at the site of the bite or sting
Fever
Headache
Nausea and vomiting
Muscle cramps
Trouble breathing
Seizures
Unresponsiveness
If you know that someone was bitten or stung by a poisonous spider or scorpion, or they show the signs above after a bite or sting, follow these steps to help them:
Make sure the scene is safe for you and the victim before giving treatment.
Get a first aid kit.
Wear PPE
Call 9-1-1
Wash the bitten or stung area under running water with soap.
Apply a bag of ice and water wrapped in a towel over the affected area.
Tick Bites
While most ticks are harmless, some carry serious diseases. They are found in wooded areas and forests and will latch onto exposed skin. Remove ticks from the skin as soon as possible. Remove the tick quickly to reduce the risk of contracting a disease.
To treat a tick bite, follow these steps:
Get a first aid kit.
Wear PPE
Use tweezers to grab the tick by its head or mouth. Get the tweezers as close to the skin as possible and avoid pinching the tick.
Lift the tick straight out. If you pull the tick until the person’s skin tents and wait for a few seconds, the tick may let go.
Place the tick in a plastic bag or container. Keep it in case the bitten person needs medical care later.
Wash the bitten area under running water with soap.
If the tick bite occurred in an area with known tick-borne illness, it is a good idea for the bitten person to see a healthcare provider.
Other Injuries
Bleeding From the Nose
To stop a nosebleed, follow these steps:
Make sure the scene is safe.
Put on your PPE.
Have the person sit and lean forward.
Pinch the soft part of the nose on both sides with a clean dressing.
Place constant pressure on the nostrils. If bleeding doesn’t stop within a few minutes, press harder.
Call 9-1-1 if:
You can’t stop the bleeding after 15 minutes.
The bleeding is very heavy.
The person is having trouble breathing.
A person with a nosebleed should always lean forward. If they lean backward, you will see less blood, but only because it’s draining down that person’s throat, which can result in vomiting.
Bleeding From the Mouth
A mouth injury can become serious if blood or broken teeth block the airway. Like with nosebleeds, stop the bleeding by applying pressure.
When someone is bleeding from their mouth:
Make sure the scene is safe.
Get the first aid kit.
Put on PPE
If bleeding is coming from the lip, cheek, or tongue, and you can easily reach it, apply pressure with a gauze or cloth.
If you can’t stop the bleeding yourself or the person is having trouble breathing, call 9-1-1 if you haven’t already.
Tooth Injuries
Broken, loose, or knocked-out teeth can pose a choking hazard. When someone suffers a tooth injury, follow these steps:
Make sure that the scene is safe.
Get the first aid kit.
Put on PPE
Check the victim's mouth for missing, loose, or broken teeth.
If a tooth is chipped, carefully clean it and contact a dentist.
If a tooth has been knocked loose, have them bite down on a piece of gauze to hold it in place while you call a dentist.
If a tooth has fallen out, a dentist may be able to reattach it. Hold the tooth by the crown (the top) instead of the root.
Use gauze to apply pressure to the empty tooth socket and stop bleeding.
Clean the area with water or saline solution.
Store the tooth in coconut water, whole milk, or egg white. If none of these things are available, store it in a container with the person’s saliva.
Take the person to an emergency department or dentist as soon as possible.
Eye Injuries
Eye injuries are common first-aid emergencies that can lead to serious problems if left untreated. Common signs of an eye injury include pain, bruising, bleeding, swelling, and difficulty seeing. If a person’s eye has been hit hard or punctured, call 9-1-1 immediately.
When helping someone who has sustained an eye injury:
Determine that the scene is safe.
Get the first aid kit.
Put on PPE
Rinse eyes with running water to remove small debris, like dirt or sand.
Call 9-1-1 if this doesn’t help, if they are in extreme pain, or if they still can’t see.
Tell the person to keep their eyes shut until advanced help arrives.
Chemical Eye Injuries
If a toxic chemical gets into someone’s eye:
Determine that the scene is safe
Get the first aid kit.
Put on PPE
Help that person rinse their eye for 15 minutes or until help arrives.
If the chemical has only gotten into one eye, make sure it doesn’t run into the other one while you’re rinsing it. Make sure that the affected eye is lower than the unaffected eye.
Use an eyewash kit if you have one, or an eyewash station if one is nearby. If not, use tap water, saline, or contact lens solution.
Call 9-1-1 for help.
Electrical Injuries
Electricity can cause burns on the inside and outside of the body, injuring organs. Sometimes, there will be marks showing where it entered and exited the body. Electricity can be highly dangerous. It can even stop a person’s breathing or send them into cardiac arrest.
An electrical injury caused by high voltage, such as a fallen power line, the scene is probably unsafe. Notify the proper authorities, and call 9-1-1. Do not enter the area or move wires until the power is off.
CAUTION: Electricity can flow from its source, through one person, and into another. Because of this, you should never touch a person if they still have contact with the power source. Make sure the power is off first.
To help someone who has received an electrical injury:
Make sure the scene is safe.
Get the first aid kit and AED.
Put on your PPE.
Once it’s completely safe to touch the injured person, give CPR if needed.
A healthcare provider should evaluate anyone who has sustained an electrical injury.
Heat-Related Medical Emergencies
Dehydration
Exposure to extreme heat can be dangerous, especially during physical activity. A lack of proper care can lead to life-threatening medical conditions.
Dehydration occurs when a person loses too much water or fluids as a result of:
Heat exposure
Excessive exercise
Vomiting or diarrhea
Fever
Insufficient fluid intake
Signs of dehydration:
Weakness
Thirst
Dry mouth
Dizziness
Confusion
Less urination than usual
Treating dehydration:
If you think that a person is dehydrated, contact a healthcare provider as soon as possible. The best option for treating dehydration is prevention: drinking and eating enough to stay hydrated is important.
Heat Cramps
Heat cramps are painful muscle spasms that can occur due to an electrolyte imbalance. They usually occur in the calves, arms, stomach muscles, and back. The symptoms are usually not dangerous on their own, but they are a warning sign.
Signs of heat cramps
Muscle cramping and spasms
Sweating
Headache
Heat cramps are a warning sign. You must take action, or the person may develop more severe heat-related symptoms.
Helping a person with heat cramps
Get a first aid kit.
Wear PPE
Have the person sit or lie down, rest, and cool off.
Have the person drink a sugary electrolyte drink. Sports drinks or juice are preferable. If those are not available, just have them drink water.
Apply a bag of ice and water wrapped in a towel over the affected area, if the person can tolerate it.
Heat Exhaustion
Milder conditions, such as heat cramps, can progress to heat exhaustion if not recognized and treated promptly. It is essential to know the signs to prevent the situation from worsening.
Signs of heat exhaustion
Nausea
Vomiting
Dizziness
Muscle cramps
Fatigue
Feeling faint
Heavy sweating
Steps to treat heat exhaustion
Get a first aid kit.
Wear PPE
Call 9-1-1
Have the person lie down in a cool place.
Remove as much of their clothing as possible.
Cool the person down with a cool water spray. If it is not available, place a cold, damp towel on their neck, armpits, and groin.
If the person is responsive:
Have the person drink something with sugar and electrolytes. Sports drinks or juice are preferable. If those are not available, just have them drink water.
Heat Stroke
It is important to treat heat-related conditions promptly. Without quick treatment, they may suffer heat stroke, a life-threatening condition. If you suspect a person is having heat stroke, help to cool them off immediately. If you cannot immerse someone in cool water, spray them with a cool water spray. However, if they begin to behave normally again, stop cooling them. Overcooling them can lead to hypothermia.
Signs of Heat Stroke
Confusion
Nausea
Vomiting
Fatigue
Feeling faint
Fainting
Muscle cramps
Seizure
Steps to treat someone who has heat stroke
Call, or have someone else call 9-1-1.
Immerse the person in cool water up to their neck if possible, or spray them with cool water.
If the person becomes unresponsive or is not breathing normally, give CPR.
Cold-Related Medical Emergencies
What is Frostbite?
Frostbite occurs when exposed to extremely cold conditions. It usually happens outside in cold weather, but it can also occur indoors when exposed to cold materials, such as cold gases, when not properly protected.
Signs and Symptoms of Frostbite
The skin on the affected area is white, waxy, or grayish-yellow.
The affected area is cold and numb.
The affected area is hard, and the skin does not move when pushed.
Treating Frostbite
Follow these steps to help someone suffering from frostbite:
Make sure the scene is safe for both you and the person with frostbite before giving first aid.
Move the frostbitten person to a warm place.
Get a first aid kit.
Wear PPE
Call 9-1-1
Remove wet or tight clothing.
Pat the body dry.
Help the person with frostbite change into dry clothes.
Cover the person with frostbite in a blanket.
Remove tight jewelry from the affected area.
CAUTION: When treating someone with frostbite, avoid the following:
Do not try to thaw the frozen part of the body if you think it may refreeze before the person can get proper medical care.
Do not rub the frostbitten area, as rubbing can cause damage. If you need to touch the area, do so gently.
Hypothermia (Low Body Temperature)
Hypothermia occurs when the body loses heat faster than it can produce it. Hypothermia is when the core body temperature drops below 95 degrees Farenheight (35 Celsius). Exposure to wet or cold conditions for too long can lead to hypothermia. Staying out in the snow or rain can lead to hypothermia, even if the temperature is above freezing. Hypothermia can lead to serious problems or death.
Signs and symptoms of hypothermia
Skin that is cool to the touch.
Shivering (which can stop when the body’s temperature becomes too low).
Personality change
Confusion
Sleepiness
A lack of concern about their condition.
Muscles become stiff and rigid.
Skin becomes cold and blue.
As a person’s body temperature continues to drop, it may be difficult to tell whether they are still breathing. They may become unresponsive or appear dead, even if they are not.
Treating Hypothermia
Follow these steps to help someone with low body temperature:
Make sure the scene is safe for both you and the person with hypothermia before providing first aid.
Move the person to a warmer area.
Remove wet or tight clothing.
Pat the person dry.
Cover the person with a blanket.
Get a first aid kit and an AED.
Call 9-1-1
Dress the person in dry clothes. Cover the body and head, but not the face, with blankets, towels, or even newspapers.
Stay with the person until someone with more advanced training arrives and can take over.
If the person becomes unresponsive or is not breathing normally, give CPR.
Poisoning Emergencies
Poison is any substance that causes sickness or death if swallowed, inhaled, or gets into the skin or eyes. Many products are poisonous to people.
Poison Control Hotline
In the event of a poison emergency, contact the local poison center by calling the American Association of Poison Control Centers (Poison Control) at: 1-800-222-1222
Some locations that use chemicals may display Safety Data Sheets (SDSs). The SDS provides information on how certain chemicals can be harmful and may also include first-aid instructions.
When you call poison control, the dispatcher will ask you for additional information. Be ready to answer the following questions:
What is the name of the poison?
If you can’t name the poison, can you describe it?
How much poison did the person swallow, breathe in, or touch?
How old is the poison?
What is the weight of the person who ingested the poison?
When was the person poisoned?
How is the person feeling or acting now?
Scene safety in a Poison Emergency
When assisting someone exposed to poison, make sure the scene is safe. Look out for spills, liquids, or powders that might be poisonous. Before you can give first aid, follow these steps:
Make sure the scene is safe for both you and the poisoned person before you approach them to give first aid.
Look for warning signs of poison.
Look out for spilled or leaking containers.
If there are multiple people who may have been poisoned, stay out of the scene.
Get the first aid kit.
Call 9-1-1
If the scene does not look safe:
Do not approach the ill or injured person.
Tell everyone to move away.
Tell the 9-1-1 or poison control dispatcher the name of the poison if you know it. In some cases, 9-1-1 dispatchers may connect you to a poison control center. Only give the person the antidotes that the dispatcher or poison control tells you to use. The first aid instructions on the poison itself may or may not be useful.
Contact Poisoning
Helping someone with poison on the skin or eyes
Ensure the scene is safe by following the “Scene Safety” steps outlined in the previous section.
Wear PPE when approaching the scene.
If possible, remove the person from the scene of the poison, preferably to an area with fresh air.
Quickly, but safely, wash the poison from the person’s skin and clothing.
Help the person to a source of running water, like a faucet, eyewash station, or safety shower.
Remove clothing and jewelry from areas that made contact with the poison. Use gloved hands to remove powders or other solid substances from the skin.
Run water over the area until someone with more advanced training arrives and takes over.
Ask them to blink rapidly while rinsing the eyes. If just one eye is affected, make sure the affected eye is lower than the unaffected eye, so the poison does not run from one eye into the other.
In the event that the person becomes unresponsive or stops breathing normally, begin CPR. Use a mask to provide rescue breaths in case the victim's lips or mouth are contaminated.
First Aid Kit
It is the responsibility of a first aid provider to maintain their first aid kit. It should contain the supplies needed for dealing with common emergencies. Whether you buy a first aid kit or put one together, make sure it has all the items you may need. Your kit may be different, so use this list as a reference for any items you may need to add.
Maintaining the First Aid Kit
Remember to keep your supplies in a sturdy, watertight container that is clearly labeled.
Make sure you know where your first aid kit is.
Replace any items you use from the kit so that you have them in another emergency.
Check the kit before work to make sure you have all of your supplies.
What Should Be Included in a First Aid Kit
Absorbent Compress :
32 sq in
Adhesive Bandage :
15 - 1” x 3”
Adhesive Tape :
2.5 yd
Antibiotic Ointment :
1 tube or 6 packets
Antiseptic Swabs :
10
Antiseptic Wipe :
10 - 1” x 1”
Antiseptic Towel :
10 - 24 sq in
Bandage Compress - 2 inch :
2
Bandage Compress - 3 inch :
2
Bandage Compress - 4 inch :
2
Burn Dressing :
1 - 4” x 4”
Burn Ointment :
1 tube or 6 packets
CPR Mask or Barrier :
1
Cold Pack :
2
Eye Patch/Cover :
2
Eye/Skin Wash :
2
Hot Pack :
1
Protective Gloves :
4 pairs
Razor :
1
Roller Bandage - 2 inch :
4 yd
Roller Bandage - 4 inch :
4 yd
Scissors :
1
Sterile Pads :
6 - 3" x 3"
Sting Relief Spray :
1
Triangular Bandage :
1
Tweezers :
1
Universal Precautions
Be sure to protect yourself while helping others. In addition to making sure the scene is safe, there are universal safety precautions you should take. Since you won’t know for sure, you should act with the assumption that all blood and bodily fluids contain disease-causing germs.
Personal Protective Equipment (PPE)
Your first aid kit should include personal protective equipment (PPE) such as disposable gloves and goggles. These help to keep you safe from blood, saliva, and urine.
Some people have allergic reactions to latex, so non-latex gloves should be used if possible.
Actions for Universal Precautions
Wear personal protective equipment whenever necessary. Use protective gloves whenever you give first aid. Eye protection should be worn if the ill or injured person is bleeding.
Place any disposable equipment that has touched blood or bodily fluids in a biohazard waste bag. Dispose of the bag according to company policy.
After removing your gloves, wash your hands thoroughly with soap and water for at least 20 seconds.
Actions for Exposure to Blood
You should wear PPE whenever you can. In the event that the person’s blood makes contact with your skin, or splashes in your mouth or eyes, follow these steps.
Remove your gloves
Wash your hands immediately and thoroughly for 20 seconds.
Rinse your eyes, nose, or mouth with water if blood has made contact with any of these areas.
Contact a healthcare provider as soon as possible.
Properly Removing Protective Gloves
In addition to wearing protective gloves, you will also need to know how to remove them in order to protect yourself and others from potential infection. Disposing of protective gloves properly is an important step.
To properly remove protective gloves:
Grip one glove on the outside near the cuff, and peel it down until it comes off inside out.
Cup it with your other gloved hand.
Place two fingers of your bare hand inside the cuff of the glove that is still on your other hand.
Peel that glove off so that it comes off inside out with the first glove inside it.
If blood or blood-contaminated material is on the gloves, put the gloves in a biohazard waste bag, if you have one, or in a sealable plastic bag before disposing of them.
Wash your hands thoroughly.
Practice Good Hand Hygiene
Wearing gloves is not enough. It's still essential that you wash your hands, just to be sure. It is one of the most important protections you have against infection.
After removing protective gloves:
Wet your hands with clean running water (preferably warm) and apply soap.
Scrub all surfaces of your hands and fingers for at least 20 seconds.
Rinse hands with running water.
Dry your hands with a paper towel or an air dryer
Use a paper towel to shut off the faucet, if one is available.
Sometimes you won’t be able to wash your hands immediately. In these cases, you should use a waterless hand sanitizer. Rub it into your hands, thoroughly, before letting them air dry. You should properly wash your hands with soap and water as soon as you can.
Important Considerations
Call 911 | Activate EMS
As you assess the need for first aid, you'll need to know when and how to phone for help. Calling 9-1-1 activates the EMS network of responders. Make sure that you also know where the nearest phone is. You can often find first aid kits and AEDs near emergency phones.
When to phone for help
Your company may have guidelines on when you should call 9-1-1 emergency services. As a general rule, you should call 9-1-1 when someone is seriously injured or if you don’t know what to do in an emergency.
You should call 9-1-1 if the person you’re trying to help:
Won’t respond to voice or touch.
Has chest discomfort, indicating a possible heart attack.
Shows signs of a stroke.
Has trouble breathing.
Has a severe injury or burn.
Has severe bleeding.
Has a seizure.
Can’t move part of their body.
Has been exposed to poison.
Has received an electric shock.
Good Samaritan Laws
Sometimes giving first aid results in unintended consequences. Good Samaritan laws protect first aid providers in all 50 states. They may differ depending on what state or jurisdiction you are in, so be sure to read up on the laws in your area.
Protecting the Victim’s Privacy
As a first aid responder, you may learn private things about some of the people you help, such as medical conditions. You should only share this information with EMS rescuers who need to know to do their jobs properly. If you are in your workplace, you may also need to give this information to your supervisor.
Do not share private information with friends, coworkers, or anyone who doesn’t need to know.
HIPAA laws and policies apply if you work in the healthcare industry and are acting in a professional capacity.